
K8s deployment practice in Centos6
Tossing for more than half a month, write a summary. In centos6 + docker-1.7 + k8s-1.2 can be used, installed dashboard, nexus2, harbor, but for some new things can not be used, and k8s official website documents are not version and do not understand the docker compatible version (at least official website Document), I feel that people will not be able to do it to themselves, all kinds of toss and then to the back is the version problem. The docker and k8s are hot in the container, the version is updated too fast, and the docker is up to 1.17. In summary, if you play on the centos6 to understand the k8s profile is still good, but really need to use or upgrade centos7.
Configmap-volumes is really a good thing, there is no way docker-1.7 does not support shared volume.
–
The centos6 system is relatively "old", neither systemd nor docker-engine. The various materials on the Internet are either original installation (non-bootstrap docker) or installed on centos7. I don't want to install on the system, follow the kube-deploy docker-multinode script to modify the installation, the version is not compatible, you need to open the bulldozer to fill the pit, the docker6 above the docker only 1.7 can not use kubernetes-1.3, the dashboard also needs Install it yourself.
Environmental description:
Cu2: bootstrap(etcd, flannel), main(hyperkube, pause, kubernetes-dashboard)
Cu4, cu5: bootstrap(flannel), main(hyperkube, pause)
[root@cu2 ~]# docker -H unix:///var/run/docker-bootstrap.sock ps | grep -v IMAGE | awk '{print $2}' | sort -u
gcr.io/google_containers/etcd-amd64:3.0.4
quay.io/coreos/flannel:v0.6.1-amd64
[root@cu4 ~]# docker -H unix:///var/run/docker-bootstrap.sock ps | grep -v IMAGE | awk '{print $2}' | sort -u
quay.io/coreos/flannel:v0.6.1-amd64
[root@cu2 kubernetes]# docker images
REPOSITORY                                            TAG                 IMAGE ID            CREATED             VIRTUAL SIZE
bigdata                                               v1                  9e30d146824b        38 hours ago        457.2 MB
gcr.io/google_containers/heapster-grafana-amd64       v4.0.2              74d2c72849cc        6 weeks ago         131.5 MB
gcr.io/google_containers/heapster-influxdb-amd64      v1.1.1              55d63942e2eb        6 weeks ago         11.59 MB
gcr.io/google_containers/heapster-amd64               v1.3.0-beta.1       026fb02eca65        6 weeks ago         101.3 MB
gcr.io/google_containers/kubernetes-dashboard-amd64   v1.5.1              9af7d5c61ccf        7 weeks ago         103.6 MB
gcr.io/google_containers/hyperkube-amd64              v1.2.7              1dd7250ed1b3        4 months ago        231.4 MB
quay.io/coreos/flannel                                v0.6.1-amd64        ef86f3a53de0        6 months ago        27.89 MB
gcr.io/google_containers/etcd-amd64                   3.0.4               ef5e89d609f1        6 months ago        39.62 MB
gcr.io/google_containers/kube2sky-amd64               1.15                f93305484d65        10 months ago       29.16 MB
gcr.io/google_containers/etcd-amd64                   2.2.5               a6752fb962b5        10 months ago       30.45 MB
gcr.io/google_containers/skydns-amd64                 1.0                 a925f95d080a        11 months ago       15.57 MB
gcr.io/google_containers/exechealthz-amd64            1.0                 5b9ac190b20c        11 months ago       7.116 MB
gcr.io/google_containers/pause                        2.0                 9981ca1bbdb5        17 months ago       350.2 kB
Etcd, flannel, and kubernetes-dashboard use the version of docker-multinode.
Kubelet is the latest version of 1.2 v1.2.7.
Pause: 2.0 is the version that is automatically downloaded when the apiserver and controller containers are started.
Added DNS image (2017-3-6 02:07:14)
Add heapster image (2017-3-6 17:00:48)
It is best to load all images on each machine.
ready
Install docker, Docker Docker entry
Agent, Privoxy
Mirror import and export, Docker save/load
export NO_PROXY="localhost,127.0.0.1,10.0.0.0/8"
export https_proxy=http://localhost:8118/
export http_proxy=http://localhost:8118/
Look at the operation and effect first (look at the menu and see if you can eat or not)
## 下载部署脚本
# https://github.com/winse/docker-hadoop/tree/master/k8s-centos6/docker-multinode
## 防火墙,关闭selinux
# 或者最后面增加 iptables -A INPUT -s 10.0.0.0/8 -j ACCEPT
iptables -I INPUT 1 -s 10.0.0.0/8 -j ACCEPT
## 先把镜像全部下载下来 git pull ...
* 在master节点
[root@cu2 ~]# docker images
REPOSITORY                                            TAG                 IMAGE ID            CREATED             VIRTUAL SIZE
bigdata                                               v1                  9e30d146824b        2 days ago          457.2 MB
redis                                                 3.2.8               c30a7507ec4d        6 days ago          182.9 MB
gcr.io/google_containers/heapster-grafana-amd64       v4.0.2              74d2c72849cc        6 weeks ago         131.5 MB
gcr.io/google_containers/heapster-influxdb-amd64      v1.1.1              55d63942e2eb        6 weeks ago         11.59 MB
gcr.io/google_containers/heapster-amd64               v1.3.0-beta.1       026fb02eca65        6 weeks ago         101.3 MB
gcr.io/google_containers/kubernetes-dashboard-amd64   v1.5.1              9af7d5c61ccf        7 weeks ago         103.6 MB
gcr.io/google_containers/hyperkube-amd64              v1.2.7              1dd7250ed1b3        4 months ago        231.4 MB
quay.io/coreos/flannel                                v0.6.1-amd64        ef86f3a53de0        6 months ago        27.89 MB
gcr.io/google_containers/etcd-amd64                   3.0.4               ef5e89d609f1        6 months ago        39.62 MB
gcr.io/google_containers/kube2sky-amd64               1.15                f93305484d65        10 months ago       29.16 MB
gcr.io/google_containers/etcd-amd64                   2.2.5               a6752fb962b5        10 months ago       30.45 MB
gcr.io/google_containers/skydns-amd64                 1.0                 a925f95d080a        11 months ago       15.57 MB
gcr.io/google_containers/exechealthz-amd64            1.0                 5b9ac190b20c        11 months ago       7.116 MB
gcr.io/google_containers/pause                        2.0                 9981ca1bbdb5        17 months ago       350.2 kB
## 下载kubectl
https://storage.googleapis.com/kubernetes-release/release/v1.2.7/bin/linux/amd64/kubectl
# https://kubernetes.io/docs/user-guide/prereqs/
# https://kubernetes.io/docs/user-guide/kubectl/kubectl_version/
## 环境变量
# https://kubernetes.io/docs/user-guide/kubeconfig-file/
export KUBECONFIG=/var/lib/kubelet/kubeconfig/kubeconfig.yaml
export PATH=...加kubectl所在文件夹
## 启动MASTER
./master.sh
## 测试效果
curl -fsSL http://localhost:2379/health
curl -s http://localhost:8080/healthz
curl -s http://localhost:8080/api
kubectl get ns
kubectl create namespace kube-system
* 在worker节点
[root@cu3 ~]# docker images
...
## 启动WORKER
MASTER_IP=cu2 ./worker.sh
Small situation: The first time you start the master script may be a bit problem: the setup-files container may not work properly.
You need to download easy-rsa.tar.gz from googleapi,
you can manually download it to the /root/kube directory, then run setup.
-files. Sh script. If you are not in a hurry, you may be able to run after waiting for a few more runs for a while (囧)
[root@cu2 ~]# docker exec -ti kube_kubelet_624b2 bash
root@cu2:/# /setup-files.sh IP:10.0.0.1,DNS:kubernetes,DNS:kubernetes.default,DNS:kubernetes.default.svc,DNS:kubernetes.default.svc.cluster.local
然后再次提交dashboard:
[root@cu2 docker-multinode-centos6]# ./dashboard.sh
Then start the application and test whether the container network started in the case of multiple nodes can communicate:
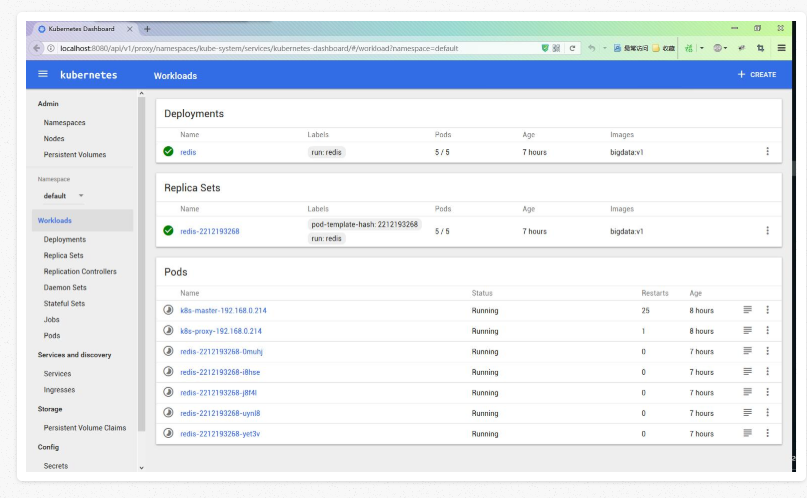
## 运行查看容器[root@cu2 ~]# kubectl run redis --image=bigdata:v1 -r 5 --command -- /usr/sbin/sshd -D[root@cu2 ~]# kubectl get pods -o wideNAME READY STATUS RESTARTS AGE NODEk8s-master-192.168.0.214 4/4 Running 22 1h 192.168.0.214k8s-proxy-192.168.0.214 1/1 Running 0 1h 192.168.0.214redis-2212193268-1789v 1/1 Running 0 1h 192.168.0.174redis-2212193268-1j4ej 1/1 Running 0 1h 192.168.0.174redis-2212193268-8dbmq 1/1 Running 0 1h 192.168.0.30redis-2212193268-a447n 1/1 Running 0 1h 192.168.0.30redis-2212193268-tu5fl 1/1 Running 0 1h 192.168.0.214https://kubernetes.io/docs/user-guide/jsonpath/[root@cu2 ~]# kubectl get pods -o wide -l run=redis -o jsonpath={..podIP}10.1.75.2 10.1.75.3 10.1.58.3 10.1.58.2 10.1.33.3## 登录容器# 用ssh登录[root@cu2 ~]# kubectl describe pods redis-2212193268-tu5fl | grep IPIP: 10.1.33.3[root@cu2 ~]# ssh 10.1.33.3The authenticity of host '10.1.33.3 (10.1.33.3)' can't be established.RSA key fingerprint is e5:58:ae:3b:54:c9:bb:0d:4c:9b:bc:fd:04:fe:be:cc.Are you sure you want to continue connecting (yes/no)? yesWarning: Permanently added '10.1.33.3' (RSA) to the list of known hosts.root@10.1.33.3's password:
Last login: Sat Mar  4 18:17:51 2017 from 10.1.61.1[root@redis-2212193268-tu5fl ~]# exitlogoutConnection to 10.1.33.3 closed.# exec登录[root@cu2 ~]# kubectl exec -ti redis-2212193268-tu5fl bash[root@redis-2212193268-tu5fl /]#
## ping五台机器全部节点的机器都是互通的[root@redis-2212193268-tu5fl /]# ping 10.1.75.2PING 10.1.75.2 (10.1.75.2) 56(84) bytes of data.64 bytes from 10.1.75.2: icmp_seq=1 ttl=60 time=1.15 ms...[root@redis-2212193268-tu5fl /]# ping 10.1.75.3PING 10.1.75.3 (10.1.75.3) 56(84) bytes of data.64 bytes from 10.1.75.3: icmp_seq=1 ttl=60 time=1.23 ms...[root@redis-2212193268-tu5fl /]# ping 10.1.58.3PING 10.1.58.3 (10.1.58.3) 56(84) bytes of data.64 bytes from 10.1.58.3: icmp_seq=1 ttl=60 time=1.60 ms...[root@redis-2212193268-tu5fl /]# ping 10.1.58.2PING 10.1.58.2 (10.1.58.2) 56(84) bytes of data.64 bytes from 10.1.58.2: icmp_seq=1 ttl=60 time=1.39 ms...[root@redis-2212193268-tu5fl /]# ping 10.1.33.3

PING 10.1.33.3 (10.1.33.3) 56(84) bytes of data.64 bytes from 10.1.33.3: icmp_seq=1 ttl=64 time=0.036 ms...
After all the startup, the rendering of the dashboard:
Learning from scripts
The official website of this Creating a Custom Cluster from Scratch looks confused, really not for the entry-level students to see. Need to have some practical experience to understand.
Another way to do this is to split the learning based on the docker-multi startup script and then simulate hands-on practice. The meaning of the bootstrap docker and the main docker is not understood at the time of learning the operation according to the Portable Multi-Node Cluster document.
This time, after extracting each function by running it separately, it is understood that it is equivalent to running two docker applications without affecting each other.
[root@cu2 ~]# ps aux|grep docker
root      5310  0.0  0.2 645128 19180 pts/1    Sl   13:14   0:01 docker -d -H unix:///var/run/docker-bootstrap.sock -p /var/run/docker-bootstrap.pid --iptables=false --ip-masq=false --bridge=none --graph=/var/lib/docker-bootstrap --exec-root=/var/run/docker-bootstrap
root      5782  1.1  0.5 2788284 43620 pts/1   Sl   13:14   0:23 /usr/bin/docker -d --mtu=1464 --bip=10.1.33.1/24
root     10935  0.0  0.0 103316   896 pts/1    S+   13:47   0:00 grep docker
After bootstrap docker starts, the containers etcd and flannel start up very smoothly.
The following questions are all tested on your own virtual machine, and then put into the test environment.
Problem 1: Performing docker0 NIC reset failed
[root@bigdata1 data]# ip link set docker0 down
[root@bigdata1 data]# ip link del docker0
RTNETLINK answers: Operation not supported
[root@bigdata1 data]# ip addr
删不掉,但是可以修改ip地址来实现相似的效果
ifconfig docker0 ${FLANNEL_SUBNET}
或者
[root@bigdata1 data]# ip link set dev docker0 mtu 1460
[root@bigdata1 data]# ip addr del 172.17.42.1/16 dev docker0
[root@bigdata1 data]# ip addr add ${FLANNEL_SUBNET} dev docker0
[root@bigdata1 data]# ip link set dev docker0 up
[root@bigdata1 data]# ifconfig # 查看重新分配的IP
先添加参数在前端运行
[root@bigdata1 data]# docker -d --mtu=1472 --bip=10.1.42.1/24
启动
[root@bigdata1 data]# sed -i 's/other_args=/other_args="--mtu=1472 --bip=10.1.42.1/24"/' /etc/sysconfig/docker
[root@bigdata1 data]# service docker start
Starting docker:                                           [确定]
[root@bigdata1 data]# service docker status
docker (pid  4542) 正在运行...
Question 2: Volumns mount does not support shared
[root@bigdata1 data]# echo $KUBELET_MOUNTS-v /sys:/sys:rw -v /var/run:/var/run:rw -v /run:/run:rw -v /var/lib/docker:/var/lib/docker:rw -v /var/lib/kubelet:/var/lib/kubelet:shared -v /var/log/containers:/var/log/containers:rw[root@bigdata1 data]# mkdir -p /var/lib/kubelet[root@bigdata1 data]# mount --bind /var/lib/kubelet /var/lib/kubelet[root@bigdata1 data]# mount --make-shared /var/lib/kubelet[root@bigdata1 data]# docker run -d \> --net=host \> --pid=host \> --privileged \> --name kube_kubelet_$(kube::helpers::small_sha) \> ${KUBELET_MOUNTS} \> gcr.io/google_containers/hyperkube-${ARCH}:${K8S_VERSION} \> /hyperkube kubelet \> --allow-privileged \> --api-servers=http://localhost:8080 \> --config=/etc/kubernetes/manifests-multi \> --cluster-dns=10.0.0.10 \> --cluster-domain=cluster.local \> ${CNI_ARGS} \> ${CONTAINERIZED_FLAG} \> --hostname-override=${IP_ADDRESS} \> --v=2Error response from daemon: invalid mode for volumes-from: shared# 改成z -- 2017-3-16 19:15:57不支持shared,后面会遇到volume的问题! KUBELET_MOUNT="-v /var/lib/kubelet:/var/lib/kubelet:z" [root@bigdata1 ~]# echo $KUBELET_MOUNTS-v /sys:/sys:rw -v /var/run:/var/run:rw -v /run:/run:rw -v /var/lib/docker:/var/lib/docker:rw -v /var/lib/kubelet:/var/lib/kubelet:z -v /var/log/containers:/var/log/containers:rw

评论专区