
NBU备份oracle
1、建立连接
[root@localhost ~]#su - oracle
[oracle@localhost ~]$ cd /usr/openv/netbackup/bin
[oracle@localhost bin]$ ./oracle_link
2012年 08月 25日 星期六 09:43:28 CST
All Oracle instances should be shutdown before running this script.
Please log into the Unix system as the Oracle owner for running this script
Do you want to continue? (y/n) [n] y
LIBOBK path: /usr/openv/netbackup/bin
ORACLE_HOME: /orcl/oracle
Oracle version: 10.2.0.1.0
Platform type: i686
Linking LIBOBK:
ln -s /usr/openv/netbackup/bin/libobk.so /orcl/oracle/lib/libobk.so
Done
Please check the trace file located in /tmp/make_trace.4459
to make sure the linking process was successful.
2、创建备份脚本
[root@localhost ~]# mkdir -p /usr/openv/netbackup/script
[root@localhost ~]#cd /usr/openv/netbackup/ext/db_ext/oracle/samples/rman
[root@localhost rman]# ls
cold_database_backup.sh database_restore.sh hot_tablespace_backup.sh
cold_duplex_database_backup_full.sh hot_database_backup.sh pit_database_restore.sh
[root@localhost rman]# cp hot_database_backup.sh /usr/openv/netbackup/script/
[root@localhost rman]# cd /usr/openv/netbackup/script/
[root@localhost script]# ls
hot_database_backup.sh
[root@localhost script]#mv hot_database_backup.sh rman.sh
[root@localhost script]#chmodo+x rman.sh
[root@localhost script]#vi rman.sh
#!/bin/sh
# $Header: hot_database_backup.sh,v 1.2 2002/08/06 23:51:42 $
#
#bcpyrght
#***************************************************************************
#* $VRTScprght: Copyright 1993 - 2008 Symantec Corporation, All Rights Reserved $ *
#***************************************************************************
#ecpyrght
#
# ---------------------------------------------------------------------------
# hot_database_backup.sh
# ---------------------------------------------------------------------------
# This script uses Recovery Manager to take a hot (inconsistent) database
# backup. A hot backup is inconsistent because portions of the database are
# being modified and written to the disk while the backup is progressing.
# You must run your database in ARCHIVELOG mode to make hot backups. It is
# assumed that this script will be executed by user root. In order for RMAN
# to work properly we switch user (su -) to the oracle dba account before
# execution. If this script runs under a user account that has Oracle dba
# privilege, it will be executed using this user's account.
# ---------------------------------------------------------------------------
# ---------------------------------------------------------------------------
# Determine the user which is executing this script.
# ---------------------------------------------------------------------------
CUSER=`id |cut -d"(" -f2 | cut -d ")" -f1`
# ---------------------------------------------------------------------------
# Put output in <this file name>.out. Change as desired.
# Note: output directory requires write permission.
# ---------------------------------------------------------------------------
RMAN_LOG_FILE=${0}.out
# ---------------------------------------------------------------------------
# You may want to delete the output file so that backup information does
# not accumulate. If not, delete the following lines.
# ---------------------------------------------------------------------------
if [ -f "$RMAN_LOG_FILE" ]
then
rm -f "$RMAN_LOG_FILE"
fi
# -----------------------------------------------------------------
# Initialize the log file.
# -----------------------------------------------------------------
echo >> $RMAN_LOG_FILE
chmod 666 $RMAN_LOG_FILE
# ---------------------------------------------------------------------------
# Log the start of this script.
# ---------------------------------------------------------------------------
echo Script $0 >> $RMAN_LOG_FILE
echo ==== started on `date` ==== >> $RMAN_LOG_FILE
echo >> $RMAN_LOG_FILE
# ---------------------------------------------------------------------------
# Replace /db/oracle/product/ora81, below, with the Oracle home path.
# ---------------------------------------------------------------------------
ORACLE_HOME=/u01/app/oracle/product/11.2.0/
export ORACLE_HOME
Oracle HOME目录,可通过env命令查出
# ---------------------------------------------------------------------------
# Replace ora81, below, with the Oracle SID of the target database.
# ---------------------------------------------------------------------------
ORACLE_SID=orcl
export ORACLE_SID
Oracle实例名
# ---------------------------------------------------------------------------
# Replace ora81, below, with the Oracle DBA user id (account).
# ---------------------------------------------------------------------------
ORACLE_USER=oracle
Oracle系统账户
# ---------------------------------------------------------------------------
# Set the target connect string.
# Replace "sys/manager", below, with the target connect string.
# ---------------------------------------------------------------------------
TARGET_CONNECT_STR=sys/Qweasd123
Sys用户及其密码
# ---------------------------------------------------------------------------
# Set the Oracle Recovery Manager name.
# ---------------------------------------------------------------------------
RMAN=$ORACLE_HOME/bin/rman
# ---------------------------------------------------------------------------
# Print out the value of the variables set by this script.
# ---------------------------------------------------------------------------
#中间代码不用更改,此处略
CMD_STR="
ORACLE_HOME=$ORACLE_HOME
export ORACLE_HOME
ORACLE_SID=$ORACLE_SID
export ORACLE_SID
$RMAN target $TARGET_CONNECT_STR nocatalog msglog $RMAN_LOG_FILE append << EOF
RUN {
ALLOCATE CHANNEL ch00 TYPE 'SBT_TAPE';
ALLOCATE CHANNEL ch01 TYPE 'SBT_TAPE';
echosend 'NB_ORA_POLICY=your_policy, NB_ORA_SERV=your_serverí';
发送备份信息给相对应的备份策略,当每一台Oracle只有一个NBU备份策略时,次句可以不写
BACKUP
$BACKUP_TYPE
SKIP INACCESSIBLE
TAG hot_db_bk_level0
FILESPERSET 5
# recommended format
FORMAT 'bk_%s_%p_%t'
DATABASE;
sql 'alter system archive log current';
RELEASE CHANNEL ch00;
RELEASE CHANNEL ch01;
# backup all archive logs
ALLOCATE CHANNEL ch00 TYPE 'SBT_TAPE';
ALLOCATE CHANNEL ch01 TYPE 'SBT_TAPE';
echosend 'NB_ORA_POLICY=your_policy, NB_ORA_SERV=your_serverí';
发送备份信息给相对应的备份策略,当每一台Oracle只有一个NBU备份策略时,次句可以不写
BACKUP
filesperset 20
FORMAT 'al_%s_%p_%t'
ARCHIVELOG ALL;
RELEASE CHANNEL ch00;
RELEASE CHANNEL ch01;
ALLOCATE CHANNEL ch00 TYPE 'SBT_TAPE';
DELETE NOPROMPT ARCHIVELOG ALL COMPLETED BEFORE 'SYSDATE-7';
RELEASE CHANNEL ch00;
原脚本备份后直接删除归档日志,可以如上编写,删除7天前的归档日志
#
# Note: During the process of backing up the database, RMAN also backs up the
# control file. This version of the control file does not contain the
# information about the current backup because "nocatalog" has been specified.
# To include the information about the current backup, the control file should
# be backed up as the last step of the RMAN section. This step would not be
# necessary if we were using a recovery catalog.
#
ALLOCATE CHANNEL ch00 TYPE 'SBT_TAPE';
BACKUP
# recommended format
FORMAT 'cntrl_%s_%p_%t'
CURRENT CONTROLFILE;
RELEASE CHANNEL ch00;
}
EOF
"
# Initiate the command string
if [ "$CUSER" = "root" ]
then
su - $ORACLE_USER -c "$CMD_STR" >> $RMAN_LOG_FILE
RSTAT=$?
else
/usr/bin/sh -c "$CMD_STR" >> $RMAN_LOG_FILE
RSTAT=$?
fi
# ---------------------------------------------------------------------------
# Log the completion of this script.
# ---------------------------------------------------------------------------
if [ "$RSTAT" = "0" ]
then
LOGMSG="ended successfully"
else
LOGMSG="ended in error"
fi
echo >> $RMAN_LOG_FILE
echo Script $0 >> $RMAN_LOG_FILE
echo ==== $LOGMSG on `date` ==== >> $RMAN_LOG_FILE
echo >> $RMAN_LOG_FILE
exit $RSTAT
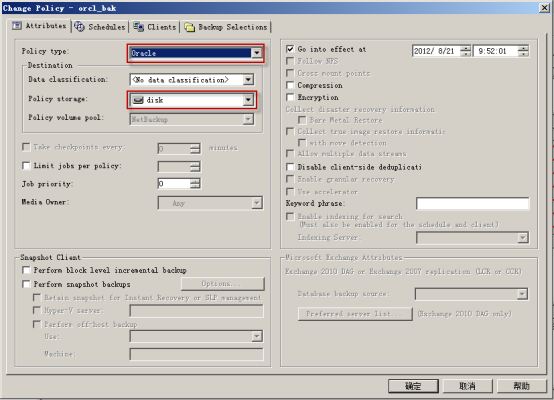
3、创建备份策略
3.1 选择策略类型和存储位置
3.2 创建备份策略
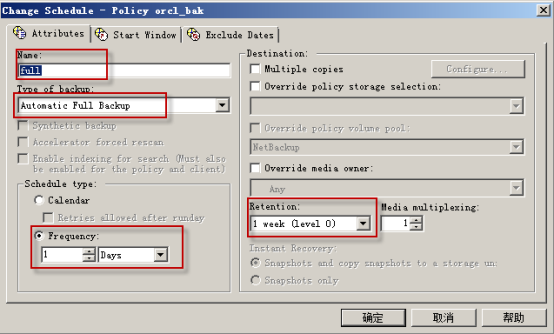
Frequency: 备份周期 Retention: 保留周期
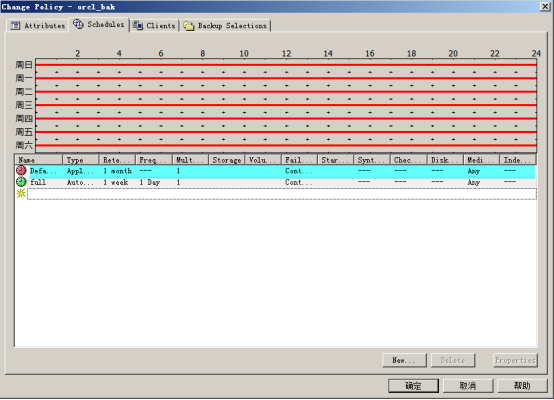
策略时间表,默认的Default-Application-Backup不要随意更改,一般只更改保留周期。
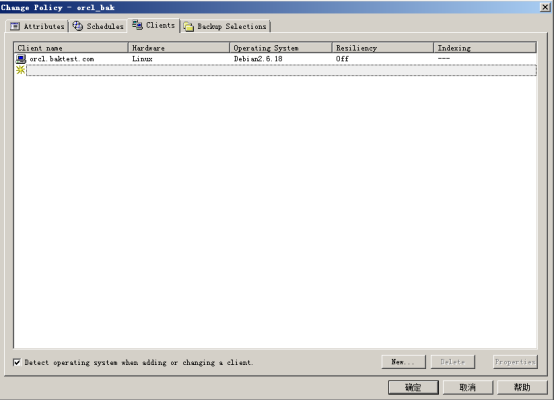
3.3 选择备份客户端
3.4 选择备份脚本

3.5 执行备份策略
4、本机恢复
4.1 删除数据文件
[root@orcl ~]# cd /u01/app/oracle/oradata/orcl
[root@orcl orcl]# rm -rf *.dbf
[root@orcl orcl]#
4.2恢复数据文件
[oracle@orcl oradata]$ rman target /
RMAN> startup mount;
connected to target database (not started)
Oracle instance started
database mounted
Total System Global Area 839282688 bytes
Fixed Size 2217992 bytes
Variable Size 528484344 bytes
Database Buffers 301989888 bytes
Redo Buffers 6590464 bytes
RMAN> run{
2> allocate channel ch00 type 'sbt_tape';
3> send 'NB_ORA_CLIENT=orcl.baktest.com';
4> send 'NB_ORA_SERV=nbumaster.baktest.com';
5> restore database;
6> recover database;
7> release channel ch00;
8> }
4.3验证恢复效果
RMAN> alter database open;
database opened
[root@orcl ~]# cd /u01/app/oracle/oradata/orcl
[root@orcl orcl]# ll
-rw-r-----. 1 oracle oinstall 9748480 8月 24 17:20 control01.ctl
-rw-r-----. 1 oracle oinstall 104865792 8月 24 17:19 example01.dbf
-rw-r-----. 1 oracle oinstall 52429312 8月 24 17:19 redo01.log
-rw-r-----. 1 oracle oinstall 52429312 8月 24 17:19 redo02.log
-rw-r-----. 1 oracle oinstall 52429312 8月 24 17:20 redo03.log
-rw-r-----. 1 oracle oinstall 566239232 8月 24 17:19 sysaux01.dbf
-rw-r-----. 1 oracle oinstall 723525632 8月 24 17:19 system01.dbf
-rw-r-----. 1 oracle oinstall 20979712 8月 24 17:19 temp01.dbf
-rw-r-----. 1 oracle oinstall 5251072 8月 24 17:19 users01.dbf
可以看到删除的数据文件都已经恢复
5:异机恢复
5.1、配置恢复环境
在需要恢复的裸机上安装相同版本的oracle,并建相同实例名的数据库
(1)、磁盘空间分配一定要够
(2)、字符集要与生产机一致
(3)、恢复的时候如果nbu找不到相关目录也是恢复不了的
5.2、在NBU server 端设置可以异机恢复,新建下面的文件:
C:\ProgramFiles\Veritas\NetBackup\db\altnames\No.restrictions
5.3、进入到“ORACLE_BASE\oradata\ORACLE_SID\”目录中,删除原有的数据文件、控制文件和redo日志文件。
5.4、在需要恢复的备机上做如下操作
C:\Users\Administrator>set oracle_sid=oracle
5.5、恢复控制文件
C:\Users\Administrator>rman target /
恢复管理器: Release 11.2.0.1.0 - Production on 星期三 9月 12 09:15:23 2012
Copyright (c) 1982, 2009, Oracle and/or its affiliates. All rights reserved.
已连接到目标数据库 (未启动)
RMAN> startup nomount;
Oracle 实例已启动
系统全局区域总计 1720328192 字节
Fixed Size 2176448 字节
Variable Size 1006635584 字节
Database Buffers 704643072 字节
Redo Buffers 6873088 字节
RMAN> set DBID=1665504156;
正在执行命令: SET DBID
RMAN>
RMAN> run{
2> allocate channel ch00 type 'sbt_tape';
3> send 'NB_ORA_CLIENT=test5';
4> send 'NB_ORA_SERV=master';
5> restore controlfile from 'bk_u0hnl0gi8_s17_p1_t793789000';
6> release channel ch00;
7> }
使用目标数据库控制文件替代恢复目录
分配的通道: ch00
通道 ch00: SID=19 设备类型=SBT_TAPE
通道ch00: Veritas NetBackup for Oracle - Release 7.5 (20120207)
向通道发命令: ch00
向通道发命令: ch00
启动 restore 于 12-9月 -12
通道 ch00: 正在还原控制文件
通道 ch00: 还原完成, 用时: 00:00:26
输出文件名=C:\APP\ADMINISTRATOR\ORADATA\ORACLE\CONTROL01.CTL
输出文件名=C:\APP\ADMINISTRATOR\FLASH_RECOVERY_AREA\ORACLE\CONTROL02.CTL
完成 restore 于 12-9月 -12
释放的通道: ch00
5.6、确定并恢复归档日志
RMAN> alter database mount;
数据库已装载
RMAN> list backup of archivelog all;
备份集列表
===================
BS 关键字 大小 设备类型占用时间 完成时间
------- ---------- ----------- ------------ ----------
7 4.50M SBT_TAPE 00:00:21 11-9月 -12
BP 关键字: 7 状态: AVAILABLE 已压缩: NO 标记: TAG20120911T155742
句柄: arch-s9-p1 介质: D:\nbu_disk\test5_1347350353_C1_F1
备份集 7 中的已存档日志列表
线程序列 低 SCN 时间下限 下一个 SCN 下一次
---- ------- ---------- ---------- ---------- ---------
1 43 1812799 11-9月 -12 1814051 11-9月 -12
1 44 1814051 11-9月 -12 1814074 11-9月 -12
BS 关键字 大小 设备类型占用时间 完成时间
------- ---------- ----------- ------------ ----------
12 33.50M SBT_TAPE 00:00:23 11-9月 -12
BP 关键字: 12 状态: AVAILABLE 已压缩: NO 标记: TAG20120911T174930
句柄: arch-s14-p1 介质: D:\nbu_disk\test5_1347357061_C1_F1
备份集 12 中的已存档日志列表
线程序列 低 SCN 时间下限 下一个 SCN 下一次
---- ------- ---------- ---------- ---------- ---------
1 43 1812799 11-9月 -12 1814051 11-9月 -12
1 44 1814051 11-9月 -12 1814074 11-9月 -12
1 45 1814074 11-9月 -12 1822433 11-9月 -12
1 46 1822433 11-9月 -12 1822456 11-9月 -12
RMAN>
下边恢复归档日志文件到指定的目录下,与原机的一样。
RMAN> run {
2> allocate channel ch00 type 'sbt_tape';
3> send 'NB_ORA_CLIENT=test5';
4> send 'NB_ORA_SERV=master';
5> set archivelog destination to 'C:\app\Administrator\flash_recovery_area\oracl
e\ARCHIVELOG';
6> restore archivelog sequence 43 thread 1;
7> restore archivelog sequence 44 thread 1;
8> restore archivelog sequence 45 thread 1;
9> restore archivelog sequence 46 thread 1;
10> release channel ch00;
11> }
分配的通道: ch00
通道 ch00: SID=19 设备类型=SBT_TAPE
通道ch00: Veritas NetBackup for Oracle - Release 7.5 (20120207)
向通道发命令: ch00
向通道发命令: ch00
正在执行命令: SET ARCHIVELOG DESTINATION
启动 restore 于 12-9月 -12
通道 ch00: 正在开始将归档日志还原到用户指定的目标
归档日志目标=C:\app\Administrator\flash_recovery_area\oracle\ARCHIVELOG
通道 ch00: 正在还原归档日志
归档日志线程=1 序列=43
通道 ch00: 正在读取备份片段 arch-s14-p1
通道 ch00: 段句柄 = arch-s14-p1 标记 = TAG20120911T174930
通道 ch00: 已还原备份片段 1
通道 ch00: 还原完成, 用时: 00:00:25
完成 restore 于 12-9月 -12
启动 restore 于 12-9月 -12
通道 ch00: 正在开始将归档日志还原到用户指定的目标
归档日志目标=C:\app\Administrator\flash_recovery_area\oracle\ARCHIVELOG
通道 ch00: 正在还原归档日志
归档日志线程=1 序列=44
通道 ch00: 正在读取备份片段 arch-s14-p1
通道 ch00: 段句柄 = arch-s14-p1 标记 = TAG20120911T174930
通道 ch00: 已还原备份片段 1
通道 ch00: 还原完成, 用时: 00:00:25
完成 restore 于 12-9月 -12
启动 restore 于 12-9月 -12
通道 ch00: 正在开始将归档日志还原到用户指定的目标
归档日志目标=C:\app\Administrator\flash_recovery_area\oracle\ARCHIVELOG
通道 ch00: 正在还原归档日志
归档日志线程=1 序列=45
通道 ch00: 正在读取备份片段 arch-s14-p1
通道 ch00: 段句柄 = arch-s14-p1 标记 = TAG20120911T174930
通道 ch00: 已还原备份片段 1
通道 ch00: 还原完成, 用时: 00:00:26
完成 restore 于 12-9月 -12
启动 restore 于 12-9月 -12
通道 ch00: 正在开始将归档日志还原到用户指定的目标
归档日志目标=C:\app\Administrator\flash_recovery_area\oracle\ARCHIVELOG
通道 ch00: 正在还原归档日志
归档日志线程=1 序列=46
通道 ch00: 正在读取备份片段 arch-s14-p1
通道 ch00: 段句柄 = arch-s14-p1 标记 = TAG20120911T174930
通道 ch00: 已还原备份片段 1
通道 ch00: 还原完成, 用时: 00:00:25
完成 restore 于 12-9月 -12
释放的通道: ch00
5.7、恢复数据文件
RMAN>run{
2> allocate channel ch00 type 'sbt_tape';
3> send 'NB_ORA_CLIENT=test5';
4> send 'NB_ORA_SERV=master';
5> set until sequence 47 thread 1;
6> restore database;
7> recover database;
8> release channel ch00;
9> }
分配的通道: ch00
通道 ch00: SID=19 设备类型=SBT_TAPE
通道ch00: Veritas NetBackup for Oracle - Release 7.5 (20120207)
向通道发命令: ch00
向通道发命令: ch00
正在执行命令: SET until clause
启动 restore 于 12-9月 -12
通道 ch00: 正在开始还原数据文件备份集
通道 ch00: 正在指定从备份集还原的数据文件
通道 ch00: 将数据文件 00002 还原到
C:\APP\ADMINISTRATOR\ORADATA\ORACLE\SYSAUX01.DBF
通道 ch00: 将数据文件 00004 还原到
C:\APP\ADMINISTRATOR\ORADATA\ORACLE\USERS01.DBF
通道 ch00: 正在读取备份片段 bk_u0bnkur8b_s11_p1_t793734411
通道 ch00: 段句柄 = bk_u0bnkur8b_s11_p1_t793734411 标记 = TAG20120911T174651
通道 ch00: 已还原备份片段 1
通道 ch00: 还原完成, 用时: 00:01:05
通道 ch00: 正在开始还原数据文件备份集
通道 ch00: 正在指定从备份集还原的数据文件
通道 ch00: 将数据文件 00001 还原到
C:\APP\ADMINISTRATOR\ORADATA\ORACLE\SYSTEM01.DBF
通道 ch00: 将数据文件 00003 还原到
C:\APP\ADMINISTRATOR\ORADATA\ORACLE\UNDOTBS01.DBF
通道 ch00: 正在读取备份片段 bk_u0ankur8b_s10_p1_t793734411
通道 ch00: 段句柄 = bk_u0ankur8b_s10_p1_t793734411 标记 = TAG20120911T174651
通道 ch00: 已还原备份片段 1
通道 ch00: 还原完成, 用时: 00:01:25
完成 restore 于 12-9月 -12
启动 recover 于 12-9月 -12
正在开始介质的恢复
线程 1 序列 45 的归档日志已作为文件 C:\APP\ADMINISTRATOR\FLASH_RECOVERY_AREA\ORA
CLE\ARCHIVELOG\ARC0000000045_0792426717.0001 存在于磁盘上
线程 1 序列 46 的归档日志已作为文件 C:\APP\ADMINISTRATOR\FLASH_RECOVERY_AREA\ORA
CLE\ARCHIVELOG\ARC0000000046_0792426717.0001 存在于磁盘上
归档日志文件名=C:\APP\ADMINISTRATOR\FLASH_RECOVERY_AREA\ORACLE\ARCHIVELOG\ARC000
0000045_0792426717.0001 线程=1 序列=45
归档日志文件名=C:\APP\ADMINISTRATOR\FLASH_RECOVERY_AREA\ORACLE\ARCHIVELOG\ARC000
0000046_0792426717.0001 线程=1 序列=46
介质恢复完成, 用时: 00:00:00
完成 recover 于 12-9月 -12
释放的通道: ch00
5.8、.验证恢复效果
RMAN> alter database open resetlogs;
数据库已打开
RMAN>
数据文件全部恢复到备库


评论专区