
nbu-oracle备份-恢复测试
NBU 实施内容
序号 | 内容 | 主要操作 |
1 | 添加LICENSE授权 | 在备份主服务器(windows)上操作,添加授权 不必在客户端(linux,hpux)操作 |
2 | 安装配置NBU客户端 | 安装客户端agent软件 配置hosts文件,配置nbu客户端与备份主服务器通信文件 配置数据库备份SH文件,确认SH生效 确认客户端能够在备份主服务器上看到 |
3 | 添加备份策略 | 在备份主服务器上配置备份策略 备份文件系统策略 备份数据库文件策略 |
4 | 备份/恢复测试 | 文件备份/恢复测试 数据库备份/恢复测试 |
NBU实施步骤
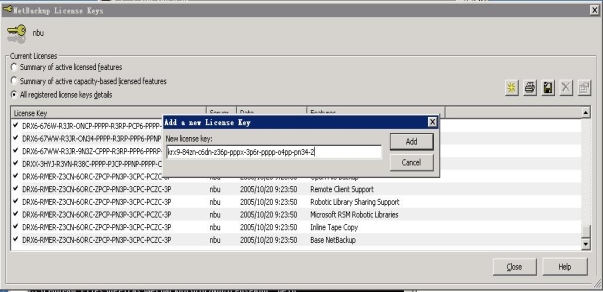
添加LICENSE:
在主服务器上,打开license keys,添加新的license key
查看license状态:
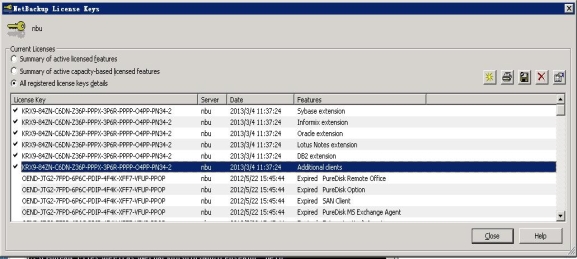
确认授权生效;
安装配置NBU客户端(linux,unix相同)
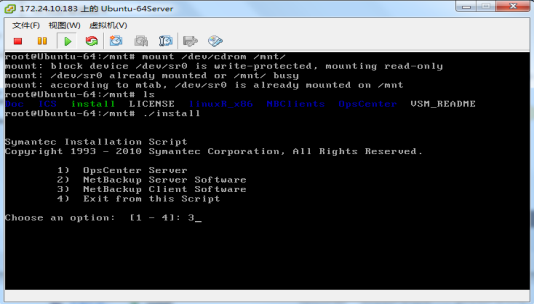
1)安装客户端软件:在需要安装Netbackup For Linux 的服务器上放入Netbackup for linux的安装光盘,并mount所插入的光盘。Cd到光盘mount的目录;
配置/etc/hosts文件,确保备份主服务器名称和ip地址能够对应并能够正常通信;
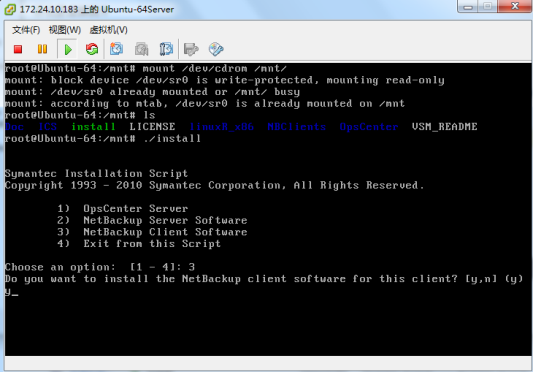
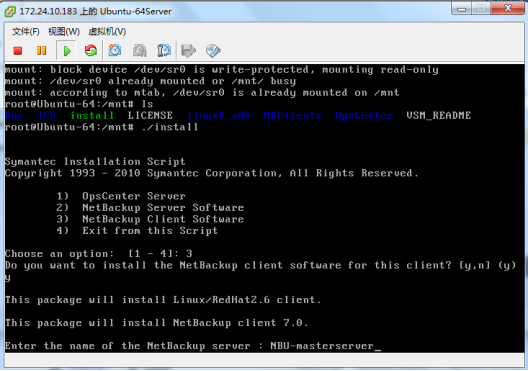
输入./install,开始安装NBU软件,在Choose an option输入3,选择安装Netbackup 客户端软件。
在Do you want to install the NetBackup Client Software for this client?输入 y,回车,确认安装。
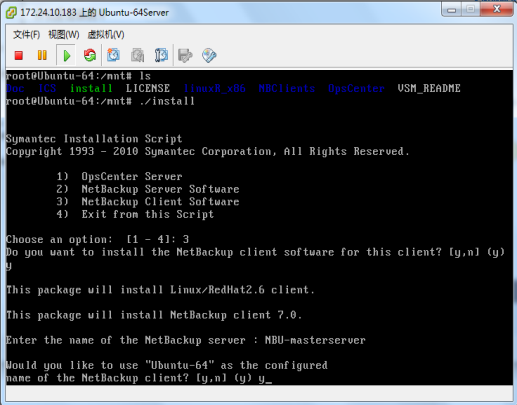
在“Enter the name of the Netbackup Master Server”输入:备份主服务器名称,回车。
在“Would you like to use the “客户端计算机名” as the configured name of the NetBackup Client?,输入y,回车。
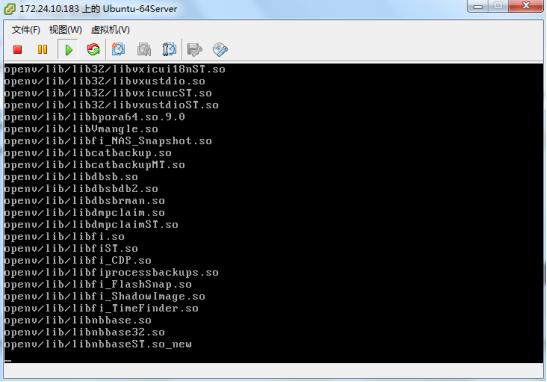
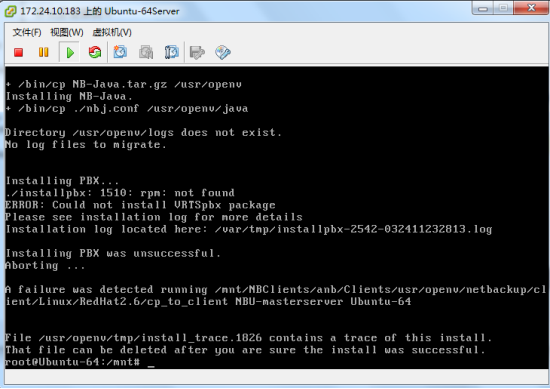
6.安装将开始,并自动完成。
安装完成后。如下图所示。
2)确认备份主服务器能够访问客户端:编辑备份主服务器的hosts文件,一般位于windows主目录的..\system32\drivers\etc\ 目录下,加入安装完成客户端软件的linux,unix主机名称和IP地址
通过nbu主控制台,添加备份策略的窗口,可以在备份目标中添加到刚刚完成客户端配置的主机
3)配置并验证oracle备份脚本
NBU对数据库的备份实际上是通过备份脚本和备份主服务器的交互来完成的,其备份脚本必须要经过修改,以符合现场的数据库环境,其包括三个主要参数,分别对应全备0,增量备份1
链接oracle:
Su – oracle
关闭数据库,执行/usr/openv/netbackup/bin/oracle_link
重新启动数据库
脚本示例:(需修改 ORACLE_HOME,ORACLE_SID, TARGET_CONNECT_STR , RMAN_PATH, NB_ORA_CLIENT,NB_ORA_SERV,NB_ORA_POLICY,日志保留时间等参数)
vi hot_database_back.sh
#!/bin/sh
# $Header: hot_database_backup.sh,v 1.3 2010/08/04 17:56:02 $
#edit by wanggang 20130304
#bcpyrght
#***************************************************************************
#* $VRTScprght: Copyright 1993 - 2011 Symantec Corporation, All Rights Reserved $ *
#***************************************************************************
#ecpyrght
#
# ---------------------------------------------------------------------------
# hot_database_backup.sh
# ---------------------------------------------------------------------------
# This script uses Recovery Manager to take a hot (inconsistent) database
# backup. A hot backup is inconsistent because portions of the database are
# being modified and written to the disk while the backup is progressing.
# You must run your database in ARCHIVELOG mode to make hot backups. It is
# assumed that this script will be executed by user root. In order for RMAN
# to work properly we switch user (su -) to the oracle dba account before
# execution. If this script runs under a user account that has Oracle dba
# privilege, it will be executed using this user's account.
# ---------------------------------------------------------------------------
# ---------------------------------------------------------------------------
# Determine the user which is executing this script.
# ---------------------------------------------------------------------------
CUSER=`id |cut -d"(" -f2 | cut -d ")" -f1`
# ---------------------------------------------------------------------------
# Put output in <this file name>.out. Change as desired.
# Note: output directory requires write permission.
# ---------------------------------------------------------------------------
RMAN_LOG_FILE=${0}.out
# ---------------------------------------------------------------------------
# You may want to delete the output file so that backup information does
# not accumulate. If not, delete the following lines.
# ---------------------------------------------------------------------------
if [ -f "$RMAN_LOG_FILE" ]
then
rm -f "$RMAN_LOG_FILE"
fi
# -----------------------------------------------------------------
# Initialize the log file.
# -----------------------------------------------------------------
echo >> $RMAN_LOG_FILE
chmod 666 $RMAN_LOG_FILE
# ---------------------------------------------------------------------------
# Log the start of this script.
# ---------------------------------------------------------------------------
echo Script $0 >> $RMAN_LOG_FILE
echo ==== started on `date` ==== >> $RMAN_LOG_FILE
echo >> $RMAN_LOG_FILE
# ---------------------------------------------------------------------------
# Replace /db/oracle/product/ora102, below, with the Oracle home path.
# ---------------------------------------------------------------------------
ORACLE_HOME=/u02/app/oracle/product/11.2.0/dbhome_1
#ORACLE_HOME=/db/oracle/product/ora102
export ORACLE_HOME
# ---------------------------------------------------------------------------
# Replace ora102, below, with the Oracle SID of the target database.
# ---------------------------------------------------------------------------
#ORACLE_SID=ora102
ORACLE_SID=fwsdb1
export ORACLE_SID
# ---------------------------------------------------------------------------
# Replace ora102, below, with the Oracle DBA user id (account).
# ---------------------------------------------------------------------------
#ORACLE_USER=ora102
ORACLE_USER=oracle
# ---------------------------------------------------------------------------
# Set the target connect string.
# Replace "sys/manager", below, with the target connect string.
# ---------------------------------------------------------------------------
TARGET_CONNECT_STR=sys/oracle1
# ---------------------------------------------------------------------------
# Set the Oracle Recovery Manager name.
# ---------------------------------------------------------------------------
RMAN=$ORACLE_HOME/bin/rman
# ---------------------------------------------------------------------------
# Print out the value of the variables set by this script.
# ---------------------------------------------------------------------------
echo >> $RMAN_LOG_FILE
echo "RMAN: $RMAN" >> $RMAN_LOG_FILE
echo "ORACLE_SID: $ORACLE_SID" >> $RMAN_LOG_FILE
echo "ORACLE_USER: $ORACLE_USER" >> $RMAN_LOG_FILE
echo "ORACLE_HOME: $ORACLE_HOME" >> $RMAN_LOG_FILE
# ---------------------------------------------------------------------------
# Print out the value of the variables set by bphdb.
# ---------------------------------------------------------------------------
echo >> $RMAN_LOG_FILE
echo "NB_ORA_FULL: $NB_ORA_FULL" >> $RMAN_LOG_FILE
echo "NB_ORA_INCR: $NB_ORA_INCR" >> $RMAN_LOG_FILE
echo "NB_ORA_CINC: $NB_ORA_CINC" >> $RMAN_LOG_FILE
echo "NB_ORA_SERV: $NB_ORA_SERV" >> $RMAN_LOG_FILE
echo "NB_ORA_POLICY: $NB_ORA_POLICY" >> $RMAN_LOG_FILE
# ---------------------------------------------------------------------------
# NOTE: This script assumes that the database is properly opened. If desired,
# this would be the place to verify that.
# ---------------------------------------------------------------------------
echo >> $RMAN_LOG_FILE
# ---------------------------------------------------------------------------
# If this script is executed from a NetBackup schedule, NetBackup
# sets an NB_ORA environment variable based on the schedule type.
# The NB_ORA variable is then used to dynamically set BACKUP_TYPE
# For example, when:
# schedule type is BACKUP_TYPE is
# ---------------- --------------
# Automatic Full INCREMENTAL LEVEL=0
# Automatic Differential Incremental INCREMENTAL LEVEL=1
# Automatic Cumulative Incremental INCREMENTAL LEVEL=1 CUMULATIVE
#
# For user initiated backups, BACKUP_TYPE defaults to incremental
# level 0 (full). To change the default for a user initiated
# backup to incremental or incremental cumulative, uncomment
# one of the following two lines.
# BACKUP_TYPE="INCREMENTAL LEVEL=1"
# BACKUP_TYPE="INCREMENTAL LEVEL=1 CUMULATIVE"
#
# Note that we use incremental level 0 to specify full backups.
# That is because, although they are identical in content, only
# the incremental level 0 backup can have incremental backups of
# level > 0 applied to it.
# ---------------------------------------------------------------------------
if [ "$NB_ORA_FULL" = "1" ]
then
echo "Full backup requested" >> $RMAN_LOG_FILE
BACKUP_TYPE="INCREMENTAL LEVEL=0"
elif [ "$NB_ORA_INCR" = "1" ]
then
echo "Differential incremental backup requested" >> $RMAN_LOG_FILE
BACKUP_TYPE="INCREMENTAL LEVEL=1"
elif [ "$NB_ORA_CINC" = "1" ]
then
echo "Cumulative incremental backup requested" >> $RMAN_LOG_FILE
BACKUP_TYPE="INCREMENTAL LEVEL=1 CUMULATIVE"
elif [ "$BACKUP_TYPE" = "" ]
then
echo "Default - Full backup requested" >> $RMAN_LOG_FILE
BACKUP_TYPE="INCREMENTAL LEVEL=0"
fi
# ---------------------------------------------------------------------------
# Call Recovery Manager to initiate the backup. This example does not use a
# Recovery Catalog. If you choose to use one, replace the option 'nocatalog'
# from the rman command line below with the
# 'catalog <userid>/<passwd>@<net service name>' statement.
#
# Note: Any environment variables needed at run time by RMAN
# must be set and exported within the switch user (su) command.
# ---------------------------------------------------------------------------
# Backs up the whole database. This backup is part of the incremental
# strategy (this means it can have incremental backups of levels > 0
# applied to it).
#
# We do not need to explicitly request the control file to be included
# in this backup, as it is automatically included each time file 1 of
# the system tablespace is backed up (the inference: as it is a whole
# database backup, file 1 of the system tablespace will be backed up,
# hence the controlfile will also be included automatically).
#
# Typically, a level 0 backup would be done at least once a week.
#
# The scenario assumes:
# o you are backing your database up to two tape drives
# o you want each backup set to include a maximum of 5 files
# o you wish to include offline datafiles, and read-only tablespaces,
# in the backup
# o you want the backup to continue if any files are inaccessible.
# o you are not using a Recovery Catalog
# o you are explicitly backing up the control file. Since you are
# specifying nocatalog, the controlfile backup that occurs
# automatically as the result of backing up the system file is
# not sufficient; it will not contain records for the backup that
# is currently in progress.
# o you want to archive the current log, back up all the
# archive logs using two channels, putting a maximum of 20 logs
# in a backup set, and deleting them once the backup is complete.
#
# Note that the format string is constructed to guarantee uniqueness and
# to enhance NetBackup for Oracle backup and restore performance.
#
#
# NOTE WHEN USING NET SERVICE NAME: When connecting to a database
# using a net service name, you must use a send command or a parms operand to
# specify environment variables. In other words, when accessing a database
# through a listener, the environment variables set at the system level are not
# visible when RMAN is running. For more information on the environment
# variables, please refer to the NetBackup for Oracle Admin. Guide.
#
# ---------------------------------------------------------------------------
CMD_STR="
ORACLE_HOME=$ORACLE_HOME
export ORACLE_HOME
ORACLE_SID=$ORACLE_SID
export ORACLE_SID
$RMAN target $TARGET_CONNECT_STR nocatalog msglog $RMAN_LOG_FILE append << EOF
RUN {
ALLOCATE CHANNEL ch00 TYPE 'SBT_TAPE' parms='ENV=(NB_ORA_CLIENT=fws91,NB_ORA_SERV=nbu,NB_ORA_POLICY=ora_fws_91)';
BACKUP
$BACKUP_TYPE
SKIP INACCESSIBLE
TAG hot_db_bk_level0
FILESPERSET 5
# recommended format
FORMAT 'bk_%s_%p_%t'
DATABASE;
sql 'alter system archive log current';
RELEASE CHANNEL ch00;
# backup all archive logs
ALLOCATE CHANNEL ch00 TYPE 'SBT_TAPE' parms='ENV=(NB_ORA_CLIENT=fws91,NB_ORA_SERV=nbu,NB_ORA_POLICY=ora_fws_91)';
BACKUP
filesperset 20
FORMAT 'al_%s_%p_%t'
# ARCHIVELOG ALL DELETE INPUT;
ARCHIVELOG ALL;
delete noprompt archivelog until time 'sysdate-2';
RELEASE CHANNEL ch00;
#
# Note: During the process of backing up the database, RMAN also backs up the
# control file. This version of the control file does not contain the
# information about the current backup because "nocatalog" has been specified.
# To include the information about the current backup, the control file should
# be backed up as the last step of the RMAN section. This step would not be
# necessary if we were using a recovery catalog or auto control file backups.
#
ALLOCATE CHANNEL ch00 TYPE 'SBT_TAPE' parms='ENV=(NB_ORA_CLIENT=fws91,NB_ORA_SERV=nbu,NB_ORA_POLICY=ora_fws_91)';
BACKUP
# recommended format
FORMAT 'cntrl_%s_%p_%t'
CURRENT CONTROLFILE;
RELEASE CHANNEL ch00;
}
EOF
"
# Initiate the command string
if [ "$CUSER" = "root" ]
then
su - $ORACLE_USER -c "$CMD_STR" >> $RMAN_LOG_FILE
RSTAT=$?
else
/usr/bin/sh -c "$CMD_STR" >> $RMAN_LOG_FILE
RSTAT=$?
fi
# ---------------------------------------------------------------------------
# Log the completion of this script.
# ---------------------------------------------------------------------------
if [ "$RSTAT" = "0" ]
then
LOGMSG="ended successfully"
else
LOGMSG="ended in error"
fi
echo >> $RMAN_LOG_FILE
echo Script $0 >> $RMAN_LOG_FILE
echo ==== $LOGMSG on `date` ==== >> $RMAN_LOG_FILE
echo >> $RMAN_LOG_FILE
exit $RSTAT
添加备份策略
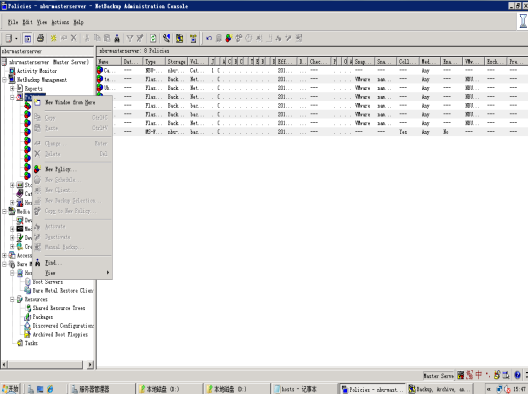
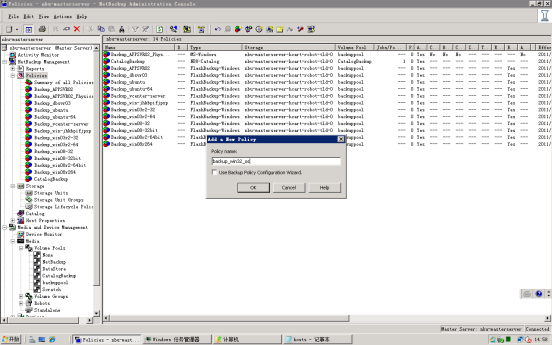
1)文件备份:一般文件备份都是周日全备,周一到周六增量备份,打开NetBackup7.0的控制台,右击NetBackup Management>Policy,选择New Policy。
设置备份策略的名称。
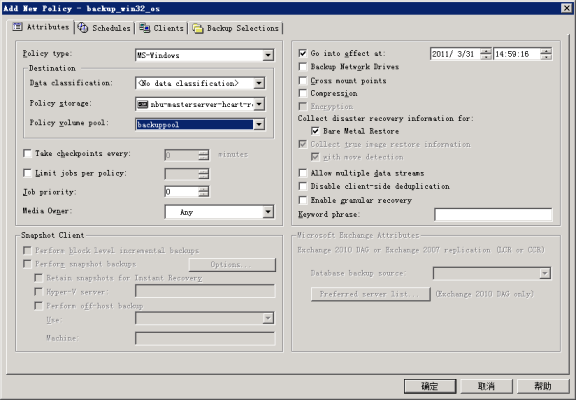
在Attributes(常规)选项卡,设置Policy type为MS-Windows,Policy storage(策略所用的存储设备)为NBU-masterserver-hcart-robot-tld-0(磁带设备)。设置Policy volume pool为 Backupool。如果是仅备份操作系统,请选择“Collect disaster recovery information for: Bare Metal Restore”复选框。
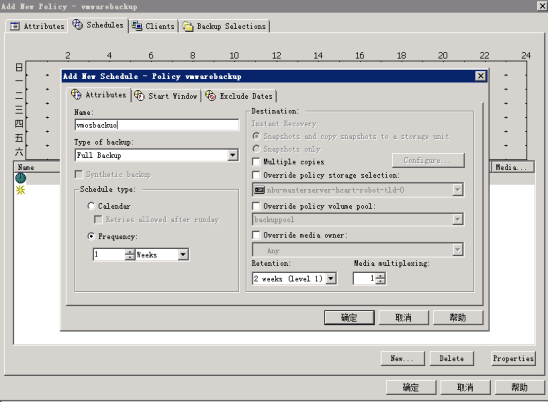
切换到“Schedules”选项卡。点击“New”按钮,添加新的调度策略。在调度策略的Attributes选项卡中,Name框中输入调度策略的名称,Tape of Backup下拉列表框设置备份类型(如是全备还是增量备份等),在Frequency处,设置备份做的启动频率(比如是一周启动一次还是一天启动一次),在Retention处,设置备份的保留时间。
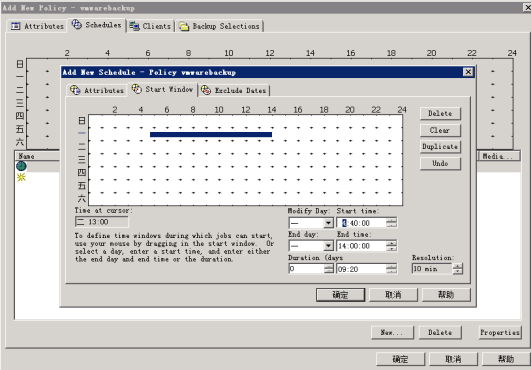
切换到调度策略的Start Windows选项卡,设置备份的启动时间,如下图所选为周一的4:40到周一的14:00之间启动运行。如需要设定其它时间,则选定周几,设定运行时间。单击“确定”按钮。
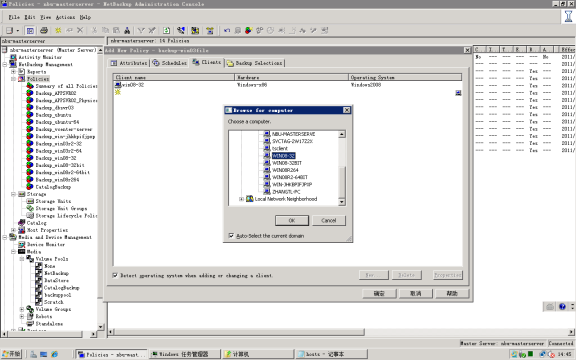
切换到“Client”选项卡。选择需要备份的虚拟机。单击“New”按钮,选择需要备份的服务器计算机名,单击“OK”,确定。
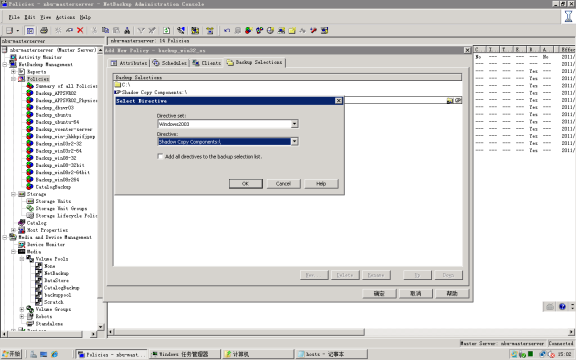
切换到Backup Selections选项卡,选择C:盘(如果有程序安装到其它磁盘,建议选中其它磁盘。);还需要通过单击小手形图标,添加选择 Shadow Copy Components\组件。
点击“确定”按钮。
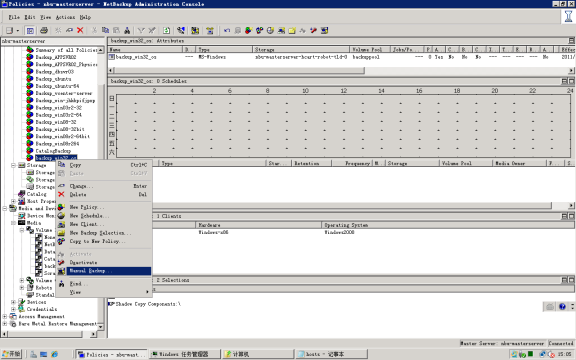
新的策略建好后如下图所示。

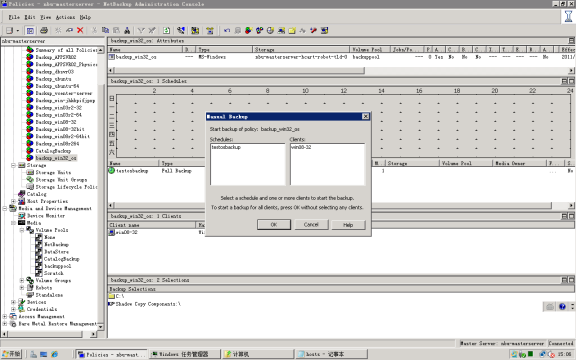
策略建好后,备份作业将在定义的时间启动,也可以手动启动备份作业。右击建好的备份策略,选择“Manual Backup”,手动启动备份作业。
选择调度,单击“OK”,手动启动备份作业。
在Activity Monitor,查看备份作业的运行过程和运行结果。绿了运行的小人表示作业正在运行。蓝色的小人表示作业成功完成。红色的叉表示作业失败。
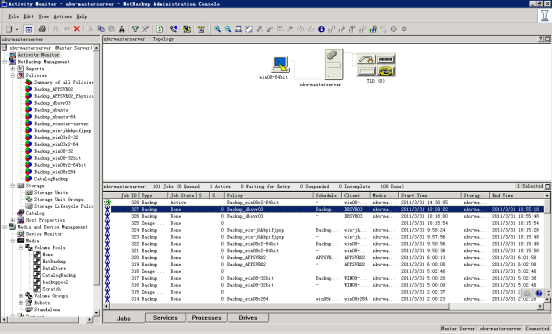
双击作业,可以查看作业的详细信息。如备份作业用时,备份的数据量,备份的速度,备份的文件数量等。

2)数据库备份:每日增量备份,周日全备
类似于文件备份,策略名称要求与脚本中所写的备份策略名称一致,才能够调用oracle的备份脚本;是否备份控制文件,在oracle备份脚本中配置,示例中为备份控制文件;
备份/恢复测试
1)文件备份/恢复示例
直接通过管理界面进行,可针对测试目录中的文件,进行备份,删除,恢复操作,确认文件备份生效
2)数据库备份/恢复示例(恢复到最近或指定的时间点)
测试步骤:
(1)在备份任务完成后,删除测试表内数据或drop掉某表
(2)更改完成后,submit提交,关闭数据库,重启数据库确认该表为空或该表不存在。
(3)进行数据恢复测试:
a)登录为oracle用户.
b)shutdown immediate关闭数据库。
c)sqlplus / as sysdba上执行startup mount;命令。
d)执行完成,用exit命令退出sqlplus,然后用rman target=/ nocatalog 命令进入rman 状态。执行下面命令来进行数据恢复。
sql "alter session set nls_date_format=''yyyy-mm-dd hh24:mi:ss''";(设置数据库时间格式)
RUN {
set until time '2013-5-10 03:12:00'; (设置恢复时间点)
ALLOCATE CHANNEL ch00 TYPE 'SBT_TAPE' parms ='ENV= ( NB_ORA_CLIENT = fws91 , NB_ORA_SERV=nbu,NB_ORA_POLICY=ora_fws_91)';(和备份脚本中channel配置一样)
RESTORE
DATABASE;
RECOVER
DATABASE;
sql 'alter database open resetlogs';
RELEASE CHANNEL ch00;
}
进行数据库恢复。
如删除数据库文件方式,可先通过文件恢复数据库,然后用上述方式恢复到指定时间点。
进入sqlplus执行startup命令来启动数据库,启动完成后,进行数据查看,可以看到表内的数据,说明恢复成功。
结论:本项目主要为:添加LICENSE授权、安装配置NBU客户端、添加备份策略、备份/恢复测试等操作,预计工作时间为三个工作日,数据库/文件恢复测试可在测试环境中进行,生产主机不受影响


评论专区