
Linux安装mysql(mysql-5.7.23-1.el7.x86_64.rpm-bundle.tar)
注意:Centos-7修改yum源为国内的yum源
下载mysql
国外地址yum源下载慢,下到一半就断了,就这个原因就修改它为国内yum源地址
国内也就是ali 与 网易
以centos7为例 ,以 修改为阿里的yum源
1. 备份本地yum源
mv /etc/yum.repos.d/CentOS-Base.repo /etc/yum.repos.d/CentOS-Base.repo_bak
2.获取阿里yum源配置文件
wget -O /etc/yum.repos.d/CentOS-Base.repo http://mirrors.aliyun.com/repo/Centos-7.repo
3.更新cache
yum makecache
4.查看
yum -y update
5.最后你就可以链接国内镜像了,其实就是那个什么城XXX的 。。。
mv /etc/yum.repos.d/CentOS-Base.repo /etc/yum.repos.d/CentOS-Base.repo_bak
wget -O /etc/yum.repos.d/CentOS-Base.repo http://mirrors.aliyun.com/repo/Centos-7.repo
yum makecache
yum -y update
安装mysql
4、下载mysql的repo源
到官网下载安装包:
https://www.mysql.com/
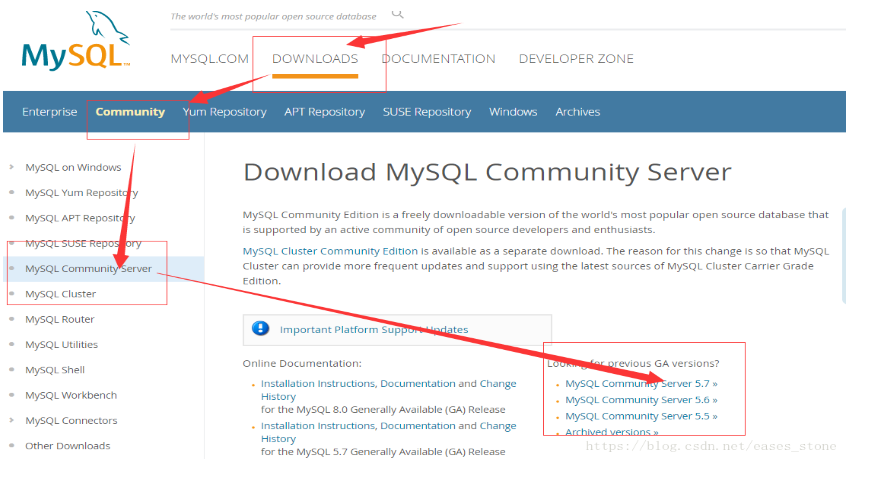
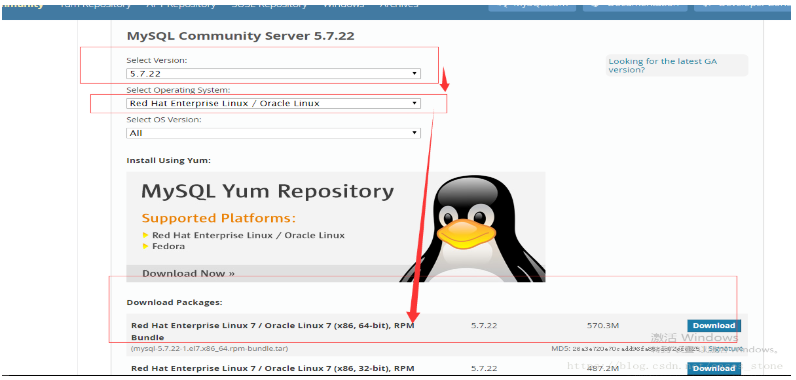
需要下载1个500M左右的安装包(安装包为最近更新,与教程不符合请自行下载对应RPM 安装包)
mysql-5.7.24-1.el7.x86_64.rpm-bundle.tar
https://dev.mysql.com/get/Downloads/MySQL-5.7/mysql-5.7.24-1.el7.x86_64.rpm-bundle.tar
通过xshell的rz命令将mysql-5.7.18-1.el7.x86_64.rpm-bundle.tar上传到Linux系统中。
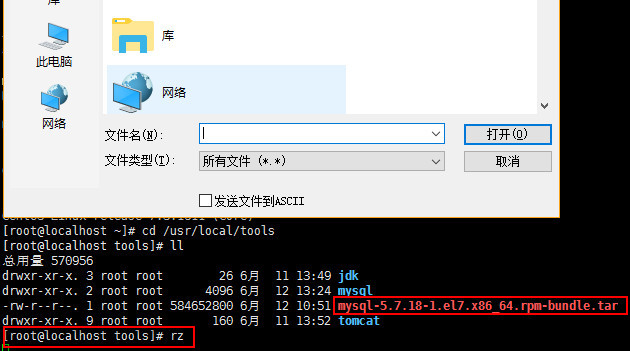
注:我上传到的路径 根目录
解压到指定的文件夹
tar -xvf mysql-5.7.22-1.el7.x86_64.rpm-bundle.tar
得到文件列表如下:

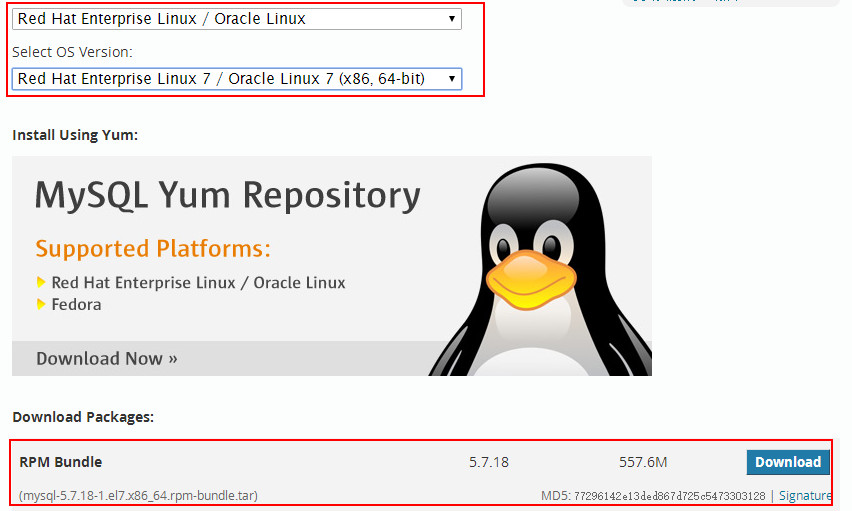
1.下载mysql
官网地址:https://dev.mysql.com/downloads/mysql/5.7.html#downloads
2.下载完成后,通过ftp上传到Linux服务器上
(1)创建mysql5.7.23目录
[root@VM_0_16_centos ~]# mkdir mysql5.7.23
mysql5.7.23
(2)将下载好的安装上传到该目录下
[root@VM_0_16_centos ~]# cd mysql5.7.23
[root@VM_0_16_centos mysql5.7.23]# ls
mysql-5.7.23-1.el7.x86_64.rpm-bundle.tar
3.解压安装包(mysql-5.7.23-1.el7.x86_64.rpm-bundle.tar)
[root@VM_0_16_centos mysql5.7.23]# tar xvf mysql-5.7.23-1.el7.x86_64.rpm-bundle.tar
mysql-community-common-5.7.23-1.el7.x86_64.rpm
mysql-community-libs-compat-5.7.23-1.el7.x86_64.rpm
mysql-community-minimal-debuginfo-5.7.23-1.el7.x86_64.rpm
mysql-community-server-5.7.23-1.el7.x86_64.rpm
mysql-community-devel-5.7.23-1.el7.x86_64.rpm
mysql-community-libs-5.7.23-1.el7.x86_64.rpm
mysql-community-client-5.7.23-1.el7.x86_64.rpm
mysql-community-server-minimal-5.7.23-1.el7.x86_64.rpm
mysql-community-test-5.7.23-1.el7.x86_64.rpm
mysql-community-embedded-devel-5.7.23-1.el7.x86_64.rpm
mysql-community-embedded-5.7.23-1.el7.x86_64.rpm
mysql-community-embedded-compat-5.7.23-1.el7.x86_64.rpm
[root@VM_0_16_centos mysql5.7.23]#
4.卸载掉centos7自带的mariadb-lib
方法一:
(1)查询mariadb信息
[root@VM_0_16_centos mysql5.7.23]# rpm -qa|grep mariadb
mariadb-libs-5.5.56-2.el7.x86_64
(2)使用rpe -e命令卸载
[root@VM_0_16_centos mysql5.7.23]# rpm -e mariadb-libs-5.5.56-2.el7.x86_64 --nodeps
此方法卸载失败或者报错,请使用方法二
方法二:
使用yum remove 命名进行删除
[root@VM_0_16_centos mysql5.7.23]# yum remove mysql-libs
------------------------------------------------------------------------------------------------------------------------
已加载插件:fastestmirror, langpacks
正在解决依赖关系
--> 正在检查事务
---> 软件包 mariadb-libs.x86_64.1.5.5.44-2.el7.centos 将被 删除
--> 正在处理依赖关系 libmysqlclient.so.18()(64bit),它被软件包 2:postfix-2.10.1-6.el7.x86_64 需要
--> 正在处理依赖关系 libmysqlclient.so.18(libmysqlclient_18)(64bit),它被软件包 2:postfix-2.10.1-6.el7.x86_64 需要
--> 正在检查事务
---> 软件包 postfix.x86_64.2.2.10.1-6.el7 将被 删除
--> 解决依赖关系完成
base/7/x86_64                                                                                                   | 3.6 kB  00:00:00
extras/7/x86_64                                                                                                 | 3.4 kB  00:00:00
updates/7/x86_64                                                                                                | 3.4 kB  00:00:00
依赖关系解决
=======================================================================================================================================
 Package                         架构                      版本                                     源                            大小
=======================================================================================================================================
正在删除:
 mariadb-libs                    x86_64                    1:5.5.44-2.el7.centos                    @anaconda                    4.4 M
为依赖而移除:
 postfix                         x86_64                    2:2.10.1-6.el7                           @anaconda                     12 M
事务概要
=======================================================================================================================================
移除  1 软件包 (+1 依赖软件包)
安装大小:17 M
是否继续?[y/N]:y
Downloading packages:
Running transaction check
Running transaction test
Transaction test succeeded
Running transaction
警告:RPM 数据库已被非 yum 程序修改。
** 发现 4 个已存在的 RPM 数据库问题, 'yum check' 输出如下:
icedtea-web-1.6.1-4.el7.x86_64 有缺少的需求 java-1.8.0-openjdk
jline-1.0-8.el7.noarch 有缺少的需求 java >= ('0', '1.5', None)
1:libreoffice-core-4.3.7.2-5.el7.x86_64 有缺少的需求 java-headless >= ('1', '1.6', None)
1:libreoffice-ure-4.3.7.2-5.el7.x86_64 有缺少的需求 libjvm.so()(64bit)
  正在删除    : 2:postfix-2.10.1-6.el7.x86_64                                                                                      1/2
  正在删除    : 1:mariadb-libs-5.5.44-2.el7.centos.x86_64                                                                          2/2
  验证中      : 1:mariadb-libs-5.5.44-2.el7.centos.x86_64                                                                          1/2
  验证中      : 2:postfix-2.10.1-6.el7.x86_64                                                                                      2/2
删除:
  mariadb-libs.x86_64 1:5.5.44-2.el7.centos
作为依赖被删除:
  postfix.x86_64 2:2.10.1-6.el7
完毕!
5.安装mysql-server服务,只需要安装如下4个软件包即可,使用rpm -ivh进行安装(按顺序安装,后面的服务依赖前面的服务)
[root@VM_0_16_centos mysql5.7.23]# rpm -ivh mysql-community-common-5.7.23-1.el7.x86_64.rpm
警告:mysql-community-common-5.7.23-1.el7.x86_64.rpm: 头V3 DSA/SHA1 Signature, 密钥 ID 5072e1f5: NOKEY
准备中...                          ################################# [100%]
正在升级/安装...
   1:mysql-community-common-5.7.23-1.e################################# [100%]
[root@VM_0_16_centos mysql5.7.23]# rpm -ivh mysql-community-libs-5.7.23-1.el7.x86_64.rpm
警告:mysql-community-libs-5.7.23-1.el7.x86_64.rpm: 头V3 DSA/SHA1 Signature, 密钥 ID 5072e1f5: NOKEY
准备中...                          ################################# [100%]
正在升级/安装...
   1:mysql-community-libs-5.7.23-1.el7################################# [100%]
[root@VM_0_16_centos mysql5.7.23]# rpm -ivh mysql-community-client-5.7.23-1.el7.x86_64.rpm
警告:mysql-community-client-5.7.23-1.el7.x86_64.rpm: 头V3 DSA/SHA1 Signature, 密钥 ID 5072e1f5: NOKEY
准备中...                          ################################# [100%]
正在升级/安装...
   1:mysql-community-client-5.7.23-1.e################################# [100%]
[root@VM_0_16_centos mysql5.7.23]# rpm -ivh mysql-community-server-5.7.23-1.el7.x86_64.rpm
警告:mysql-community-server-5.7.23-1.el7.x86_64.rpm: 头V3 DSA/SHA1 Signature, 密钥 ID 5072e1f5: NOKEY
准备中...                          ################################# [100%]
正在升级/安装...
   1:mysql-community-server-5.7.23-1.e################################# [100%]
6.安装过程中可能出现的问题
1).缺少libaio
[root@VM_0_16_centos mysql5.7.23]# rpm -ivh mysql-community-server-5.7.17-1.el7.x86_64.rpm
警告:mysql-community-server-5.7.17-1.el7.x86_64.rpm: 头V3 DSA/SHA1 Signature, 密钥 ID 5072e1f5: NOKEY
错误:依赖检测失败:
	libaio.so.1()(64bit) 被 mysql-community-server-5.7.17-1.el7.x86_64 需要
	libaio.so.1(LIBAIO_0.1)(64bit) 被 mysql-community-server-5.7.17-1.el7.x86_64 需要
	libaio.so.1(LIBAIO_0.4)(64bit) 被 mysql-community-server-5.7.17-1.el7.x86_64 需要
	net-tools 被 mysql-community-server-5.7.17-1.el7.x86_64 需要
解决办法:
[root@VM_0_16_centos mysql5.7.23]# yum install libaio
2)缺少net-tools
[root@VM_0_16_centos mysql5.7.23]# rpm -ivh mysql-community-server-5.7.17-1.el7.x86_64.rpm
警告:mysql-community-server-5.7.17-1.el7.x86_64.rpm: 头V3 DSA/SHA1 Signature, 密钥 ID 5072e1f5: NOKEY
错误:依赖检测失败:
	net-tools 被 mysql-community-server-5.7.17-1.el7.x86_64 需要
解决办法:

yum install net-tools
3)缺少numactl
[root@VM_0_16_centos mysql5.7.23]# rpm -ivh mysql-community-server-5.7.17-1.el7.x86_64.rpm

报错:warning: mysql-community-server-5.7.9-1.el6.x86_64.rpm: Header V3 DSA/SHA1 Signature, key ID 5072e1f5: NOKEY
error: Failed dependencies:
        libnuma.so.1()(64bit) is needed by mysql-community-server-5.7.9-1.el6.x86_64
        libnuma.so.1(libnuma_1.1)(64bit) is needed by mysql-community-server-5.7.9-1.el6.x86_64
        libnuma.so.1(libnuma_1.2)(64bit) is needed by mysql-community-server-5.7.9-1.el6.x86_64

解决办法:
   yum  install numactl
7.初始化数据库
[root@VM_0_16_centos mysql5.7.23]#  mysqld --initialize --user=mysql  #初始化后会在/var/log/mysqld.log生成随机密码
 为了保证数据库目录为与文件的所有者为 mysql 登陆用户,如果你是以 root 身份运行 mysql 服务,需要执行下面的命令初始化
[root@VM_0_16_centos mysql5.7.23]# vi /var/log/mysqld.log #查看随机密码
8.修改mysql数据库目录的所属用户及其所属组,然后启动mysql数据库
[root@VM_0_16_centos mysql5.7.23]# chown mysql:mysql /var/lib/mysql -R
[root@VM_0_16_centos mysql5.7.23]# systemctl start mysqld.service
[root@VM_0_16_centos mysql5.7.23]# systemctl status mysqld.service
● mysqld.service - MySQL Server
   Loaded: loaded (/usr/lib/systemd/system/mysqld.service; enabled; vendor preset: disabled)
   Active: active (running) since 一 2018-08-06 20:41:25 CST; 6s ago
     Docs: man:mysqld(8)
           http://dev.mysql.com/doc/refman/en/using-systemd.html
  Process: 13031 ExecStart=/usr/sbin/mysqld --daemonize --pid-file=/var/run/mysqld/mysqld.pid $MYSQLD_OPTS (code=exited, status=0/SUCCESS)
  Process: 13003 ExecStartPre=/usr/bin/mysqld_pre_systemd (code=exited, status=0/SUCCESS)
 Main PID: 13034 (mysqld)
    Tasks: 27
   CGroup: /system.slice/mysqld.service
           └─13034 /usr/sbin/mysqld --daemonize --pid-file=/var/run/mysqld/mysqld.pid

8月 06 20:41:22 eric111 systemd[1]: Starting MySQL Server...
8月 06 20:41:25 eric111 systemd[1]: Started MySQL Server.
9.登录mysql,并修改root用户的密码(系统强制要求,否则不能操作mysql)
初始登录密码可在/var/log/mysqld.log文件中找到
[root@VM_0_16_centos mysql5.7.23]# mysql -uroot -p'-4iq<tyjVpLb'
mysql: [Warning] Using a password on the command line interface can be insecure.
Welcome to the MySQL monitor.  Commands end with ; or \g.
Your MySQL connection id is 2
Server version: 5.7.23

Copyright (c) 2000, 2018, Oracle and/or its affiliates. All rights reserved.

Oracle is a registered trademark of Oracle Corporation and/or its
affiliates. Other names may be trademarks of their respective
owners.

Type 'help;' or '\h' for help. Type '\c' to clear the current input statement.

mysql> set password=password('password11');
Query OK, 0 rows affected, 1 warning (0.00 sec)

mysql> show databases;
+--------------------+
| Database           |
+--------------------+
| information_schema |
| mysql              |
| performance_schema |
| sys                |
+--------------------+
4 rows in set (0.00 sec)
10.修改访问权限
目的:任何主机通过用户root和密码password11连接到mysql服务器
GRANT ALL PRIVILEGES ON *.* TO 'root'@'%' IDENTIFIED BY 'password11' WITH GRANT OPTION;


评论专区